This post may contain affiliate links, including those from Amazon Associates. If you make a purchase through these links, I may earn a commission at no additional cost to you. Learn more about our affiliate policy.
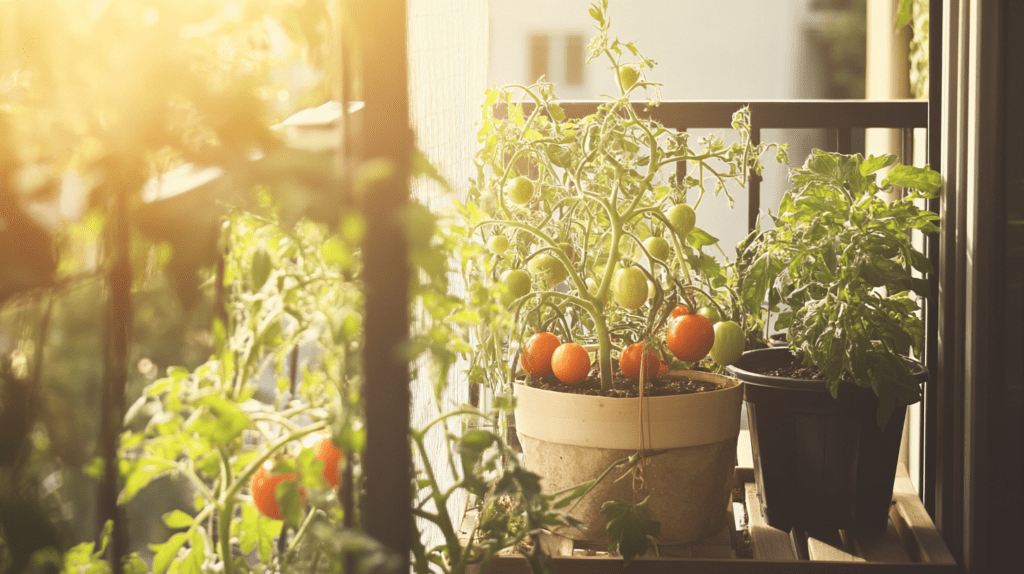
I used to watch my balcony basil and backyard mint explode every summer, feeling this mix of joy and panic – what do I do with all this?
Tossing wilted herbs broke my heart, but then I found the simple art of drying my herbs. You can turn those fresh leaves into something even better, a flavor stash for my kitchen all year. If you’re a beginner homesteader in an apartment or small backyard, growing and drying herbs is your ticket to self-sufficiency without the overwhelm. You can even save space with these diy indoor vertical herb garden wall ideas.

In this post, I’ll share practical tips to grow herbs that thrive and five simple methods to dry them, each unlocking a unique twist on their taste. No big space or fancy setup needed!
Growing Herbs: Tips for a Flavorful Start

Growing herbs is the first step to a heavenly dried stash – they need to be healthy and potent before you preserve them. Here’s how to set them up right, even in tight quarters.
Start with easy growers like basil, rosemary, mint, thyme, and oregano—they’re forgiving and dry beautifully. Pick a sunny spot (6–8 hours of light) or use a grow light if you’re indoors.
Use well-draining soil (mix potting soil with sand or perlite) and water when the top inch feels dry because overwatering’s a rookie trap I fell into. Snip leaves often to encourage bushy growth, but leave enough for the plant to recover. Fertilize lightly with organic compost every 4–6 weeks to boost flavor without overdoing it.
Strong herbs mean better drying results, so give them love from the start.
Drying Herbs: 5 Ways to Turn Fresh into Flavor Gold
Drying isn’t just preservation, it’s flavor alchemy. Each method shifts your herbs’ taste and vibe, and they’re all doable with basic stuff. Here are five ways to dry your harvest, with steps and tips to make them work for you.
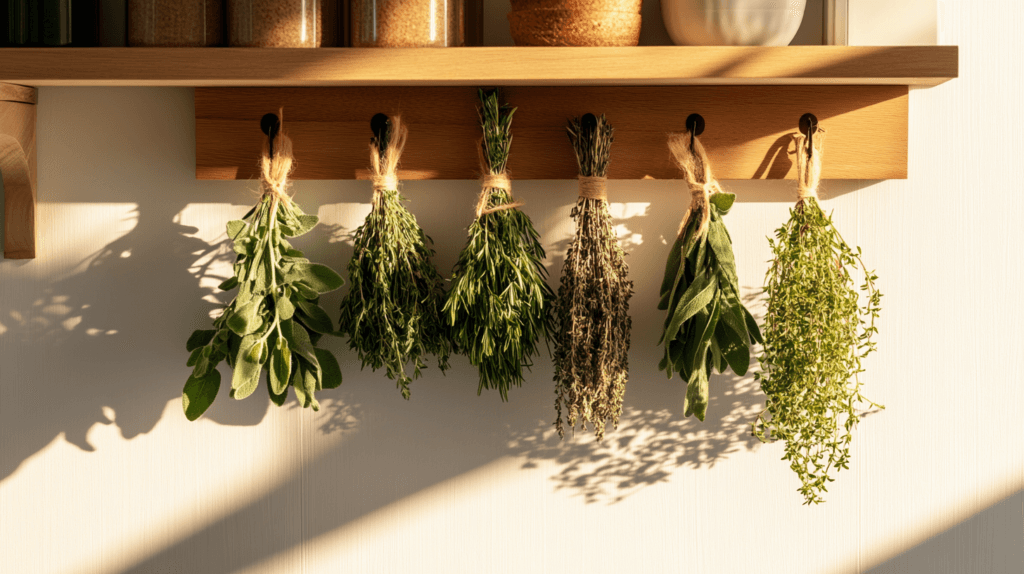
Air-Drying

Air-drying is the classic way to go. It’s slow and steady, letting herbs deepen in flavor naturally. It’s low-effort and keeps their essential oils intact, which means you get a punch of taste in every pinch. This method shines for woody herbs that don’t mind a little time, turning them into potent pantry staples. Plus, it’s free – no energy bills, just patience.
- How To: Harvest herbs in the morning after dew dries, when oils are strongest. Tie stems in small bundles (4–6 sprigs) to avoid mold, hang upside down in a warm, dry, well-ventilated spot like a kitchen corner or near a sunny window. If you prefer, slip a paper bag over each bundle to catch crumbs and keep dust off. Check after 1–2 weeks; they’re ready when leaves crumble easily.
- Best For: Low-moisture, sturdy herbs like rosemary, thyme, oregano.
- Benefits: Boosts potency, no cost, adds a rustic touch to your space.
- Tips: Space bundles apart for airflow. If humidity’s high, use a fan to keep things moving as mold can sneak in fast. Store in glass jars away from light to keep that flavor locked in.
- Why I Love It: Hanging herbs feels like a little homestead ritual, and the smell fills my kitchen with promise.
Oven-Drying

Oven-drying is your quick fix, giving herbs a slightly toasted edge that’s perfect for hearty dishes. It’s great when you need dried herbs fast or don’t have weeks to wait. For when your soups or roasts that need a warm kick. The heat speeds things up without losing too much, and it fits any small kitchen setup.
- How To: Pick clean, dry herb leaves off stems and spread them in a single layer on a baking sheet without overlapping. Set your oven to 150°F (or the lowest setting), prop the door open an inch for air flow. Dry 1–2 hours, checking every 30 minutes; they’re done when brittle but not burnt. Let cool before jarring.
- Best For: Leafy herbs that take to heat well like basil, sage, parsley
- Benefits: Fast results, adds a subtle roasted note, works in any weather.
- Tips: Use parchment paper to avoid sticking. Don’t crank the heat, low and slow keeps the good stuff in. If they brown too much, pull them out early; flavor fades with overcooking.
- Why I Love It: I can dry a batch before dinner and use it that night for an instant reward.
Dehydrator

A dehydrator gives you control, drying herbs evenly to keep their bright taste and color alive. It’s a hands-off option that’s perfect for consistent results, especially if you’ve got a big haul or tricky weather. The gentle heat preserves what makes herbs special, making it worth the countertop space.
- How To: Wash herbs, pat dry with a towel, and lay leaves or small sprigs on dehydrator trays in a single layer. Set to 95–115°F—low to protect oils—and run 2–4 hours. Check halfway; they’re ready when crisp to the touch. Cool fully before storing.
- Best For: Delicate herbs that need a soft touch like Mint, dill, and cilantro.
- Benefits: Keeps vibrancy, reliable every time, great for bulk drying.
- Tips: Don’t pile too thick: air needs to circulate. Pre-trim stems to save space. Test a leaf; if it’s not crisp, give it another hour. Store in airtight jars to hold that freshness.
- Why I Love It: It’s like a set-and-forget helper.

Drag & drop images or PDFs
Press ⌃V to capture screen area
Check out Getting Started guide
The COSORI Food Dehydrator is a compact yet powerful stainless steel dehydrator with adjustable temperatures up to 176°F, five dishwasher-safe trays, and a 48-hour timer for effortless, nutrient-rich drying of jerky, fruit, veggies, and more. Perfect for an intentional, self-sufficient lifestyle.

Microwave-Drying

Microwave-drying is the speed champ, turning fresh herbs dry in minutes with decent color retention. It’s a lifesaver for small batches or when you’re in a pinch. The trade-off is a slight dip in potency, but it’s still a solid choice for quick flavor fixes in tight spaces.
- How To: Strip clean, dry leaves and sandwich them between two paper towels on a microwave-safe plate. Zap on high in 20-second bursts, 1–2 minutes total, checking between rounds. Stop when they’re crisp. Don’t push past or they’ll scorch.
- Best For: Parsley, basil, small amounts of anything.
- Benefits: Ultra-fast, keeps green hues, fits apartment living.
- Tips: Use low power if your microwave allows for less risk of burning. Space leaves out; crowding steams them instead. Let them cool, they’ll crisp up more after. Jar right away to trap what’s left.
- Why I Love It: It’s my trick when I need dried basil for a last-minute pasta night.
Sun-Drying

Sun-drying taps into nature’s heat, infusing herbs with a warm, earthy tone that feels so pure. It’s an old-school method that works if you’ve got sunny days where you live. It’s free and hands-off, but you’ll need to plan around the weather to make it work.
- How To: Harvest herbs, spread them on a clean screen or cheesecloth in a single layer, and set in direct sun (80°F+). Cover with another screen to keep bugs off. Turn daily, bring inside at night to dodge dew, and dry 2–4 days until brittle. Check for crispness, soft spots mean more time.
- Best For: Tough herbs that soak up sun well like thyme and oregano.
- Benefits: No energy use, adds a sunny depth, feels like a homesteading win.
- Tips: Pick a dry week as rain or humidity can spoil it. Use a porch or sunny sill if you’re urban. Test a leaf; if it bends, keep going. Store in dark jars to protect that sun-kissed taste.
- Why I Love It: There’s something special about herbs dried by the sun, like bottling summer.
What To Do With Your Dried Herbs

Now that you’ve got a stash of dried herbs, what’s next? These little flavor bombs can do so much more than just liven up your cooking. Here are some fun, simple ways to use them that’ll keep you inspired.
- Tea Mixes: Blend dried mint, chamomile, or lavender for a soothing cup, try 1 teaspoon per cup of hot water. It’s a cozy way to unwind, and you can mix in spices like cinnamon for a twist.
- Epsom Salt Baths: Stir a tablespoon of dried rosemary or lavender into a cup of Epsom salts for a relaxing soak that eases tension and smells wonderful. Check out my 10 Unique DIY Epsom salt bath recipes for more ideas to pamper your body and mind.
- Herbal Sachets: Fill small cloth bags with dried lavender or mint to freshen drawers or closets. It’s a natural air freshener that doubles as a sweet gift.
- Seasoned Salts: Mix dried rosemary or sage with coarse sea salt (1 tablespoon herbs to ¼ cup salt) for a custom seasoning.
- Preserved Olive Oil: Infuse dried herbs like rosemary or thyme into olive oil for a flavor-packed kitchen staple. Just dry your herbs fully, cover with oil in a jar, and let sit for 1–2 weeks before straining. Learn more in my post on preserving food without canning.
Keep Your Herbs Going Strong
Growing tasty herbs and drying them with these five methods means you’ve got flavor gold all year with no big space or skills required. Start with a pot of basil or mint, dry it your way, and watch how it transforms your meals. Pick a method that fits your setup and give it a go, your next harvest’s waiting!